Spreadsheet validation: How to eliminate or minimise Excel mistakes.
Spreadsheet mistakes can cost businesses billions of dollars, reduce reputation and cause job losses.
As well as being extremely costly, Excel calculation Errors has been shown to influence fiscal economic policies.
Reinhart’s and Rogoff’s 2010 “Growth in a Time of Debt” paper was cited by many politicians as justification for budget cutting. Their paper was later discounted due to mistakes in their Excel calculations.
- How can we guard ourselves against making costly Excel calculation mistakes?
- How do we validate that inputs and calculations in our spreadsheets are correct?
- What types of errors do we encounter in an Excel spreadsheets and how do we find and eliminate them?
There are two basic types of errors or mistakes that are made in Excel spreadsheets:
There are two basic types of errors or mistakes that are made in Excel spreadsheets:
- Syntax errors; caused by invalid inputs according Excel rules.
- User input errors;
- Incorrect formulas
- Incorrect cell-references
- Wrong functions used
1. Syntax errors are fairly easy to deal with as long as you are aware of what they mean. Excel syntax errors and how to fix them are covered here.
2. User input errors: i.e. using the wrong formula or referring to the wrong cells can be more difficult to discover. To check the correctness and validity of a spreadsheet can sometimes be an overwhelming task, especially when the spreadsheet contains a large number of formulas spanning hundreds of rows and/or columns. Even more so when the task at hand is checking someone else’s work.
In a previous posting, check-and-audit-excel-spreadsheets, three methods were suggested, we will recap here.
Two of the methods are the standard “show formula” and “trace precedents and dependents” options provided by Microsoft.

By showing the formulas we can see what the formula looks like, and by colour coding the cell-references one can see what numbers each cell reference represents.
By using the precedents & dependents one can see which cells are referenced by the formula in a cell and also which cell is referencing the current cell.
In a simple example like the one above these options are of course useful….Thank you Microsoft!… By the way, we love Excel and we probably couldn’t live without it!
Anywho… anyone who have used Excel for work or leisure knows that using these two options to decipher what is going on in a spreadsheet can be a small “Nightmare”. Especially when the spreadsheet span hundreds of columns and/or rows and when formulas are complex and lengthy.
Also, when formulas are referencing other sheets or workbooks it can be hard keeping our enthusiasm in a positive mode!
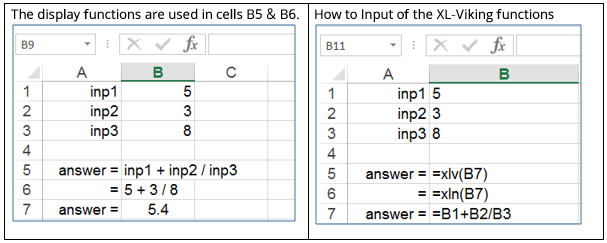
Ok, let’s look at option 3. The Xl-Viking display functions xlv and xln are used to display Excel formulas.The xlv function shows the variables and xln function shows the numbers of the formula.
Watch this short video to see how the XLN and XLV functions work.
By using these functions to display formulas we get an instant check and verification of the formula in Cell B7.
In simple terms, the xln function tracks down every cell-reference in the formula and displays the content of those cells.
The xlv function displays the variable name that the user have entered in the cell next to the reference cell.
A practical example of how these functions are used is shown below. Image 1 shows a calculation sheet NOT using the functions and Image 2 USING the functions.
By showing the formula numbers and/or variables, checking and validation of spreadsheet calculations become manageable.
Also, by incorporating display functions when the spreadsheet is being developed gives an instant feedback to the correctness of the work.
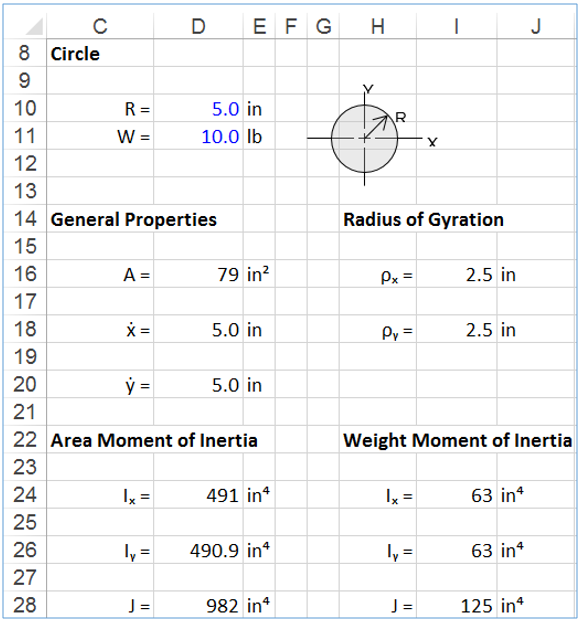
Image 1: Without Display Functions
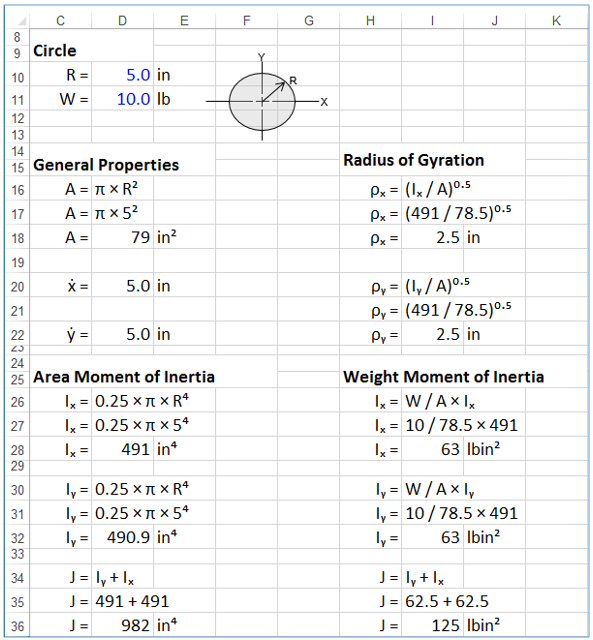
Image 2: With Display Functions